
How To DIY Your Own RV Skirting
Hey Friends! Winter is here, and if you’re an RVer braving the colder months, you’ve probably wondered how to keep your RV warm and protected. RV skirting is one of the best ways to prevent cold air from creeping in, reduce heat loss, and even save money on propane. If you’re ready to take on a rewarding project, we’re here to guide you through crafting your own DIY RV skirting.
Hi, we’re the McCartys! Our first year of winter RVing was a wake-up call. We didn’t use any skirting and the results? Drafty floors, skyrocketing propane bills, and a constant struggle to keep warm. By our second year, we knew something had to change. Enter: DIY foam board skirting. It was simple, effective, and budget-friendly—and now we’re sharing exactly how you can do it too.
If you’re not into DIY projects, don’t worry. For those seeking a hassle-free alternative, we recommend checking out AirSkirts—an easy-to-use RV skirting kit solution that doesn’t require tools or cutting. But if you’re ready to roll up your sleeves, here’s everything you need to know about creating your own RV skirting workhorse.
Read More: Stay Warm and Dry: Extra Insulation Tips for your RV
RV skirting is one of the best ways to prevent cold air from creeping in, reduce heat loss, and even save money on propane.
Why DIY RV Skirting is a Game-Changer
RV skirting isn’t just about staying warm—it’s about protecting your travel trailer from the harsh conditions of cold weather camping. Here’s why skirting is a must for winter RVing:
Reduces Heat Loss: Skirting blocks cold air from flowing under your RV, helping retain warm air and reducing the workload on your propane furnace or electric heaters.
Protects Water Lines and Tanks: Keeps your water pipes, black tank, and freshwater tank from freezing in sub-zero temperatures.
Saves Money: With better insulation, you’ll use less propane and electricity, cutting down on heating costs.
Improves Comfort: Warmer floors and reduced drafts mean a cozier RV, even in the dead of winter.
Budget-Friendly: DIY RV skirting options like foam board skirting or plywood panels are much cheaper than custom-made skirting solutions.
Read More: The Magic of Winter RV Window Covers!

Materials You’ll Need for DIY RV Skirting
Before we dive into the step-by-step process, let’s gather the essentials. For this tutorial, we’ll focus on foam board skirting, one of the most cost-effective options for RV owners. Here’s what you’ll need:
Rigid Foam Board: One-inch thick boards work well for most cold climates, but you can adjust based on your location.
Reflective Tape: Durable tape to secure the foam boards to your RV.
Tape Measure: For accurate measurements.
Pocket Knife or Utility Knife: To cut the foam boards.
Marker: For marking measurements on the foam boards.
Step-by-Step Guide: How to DIY Your RV Skirting
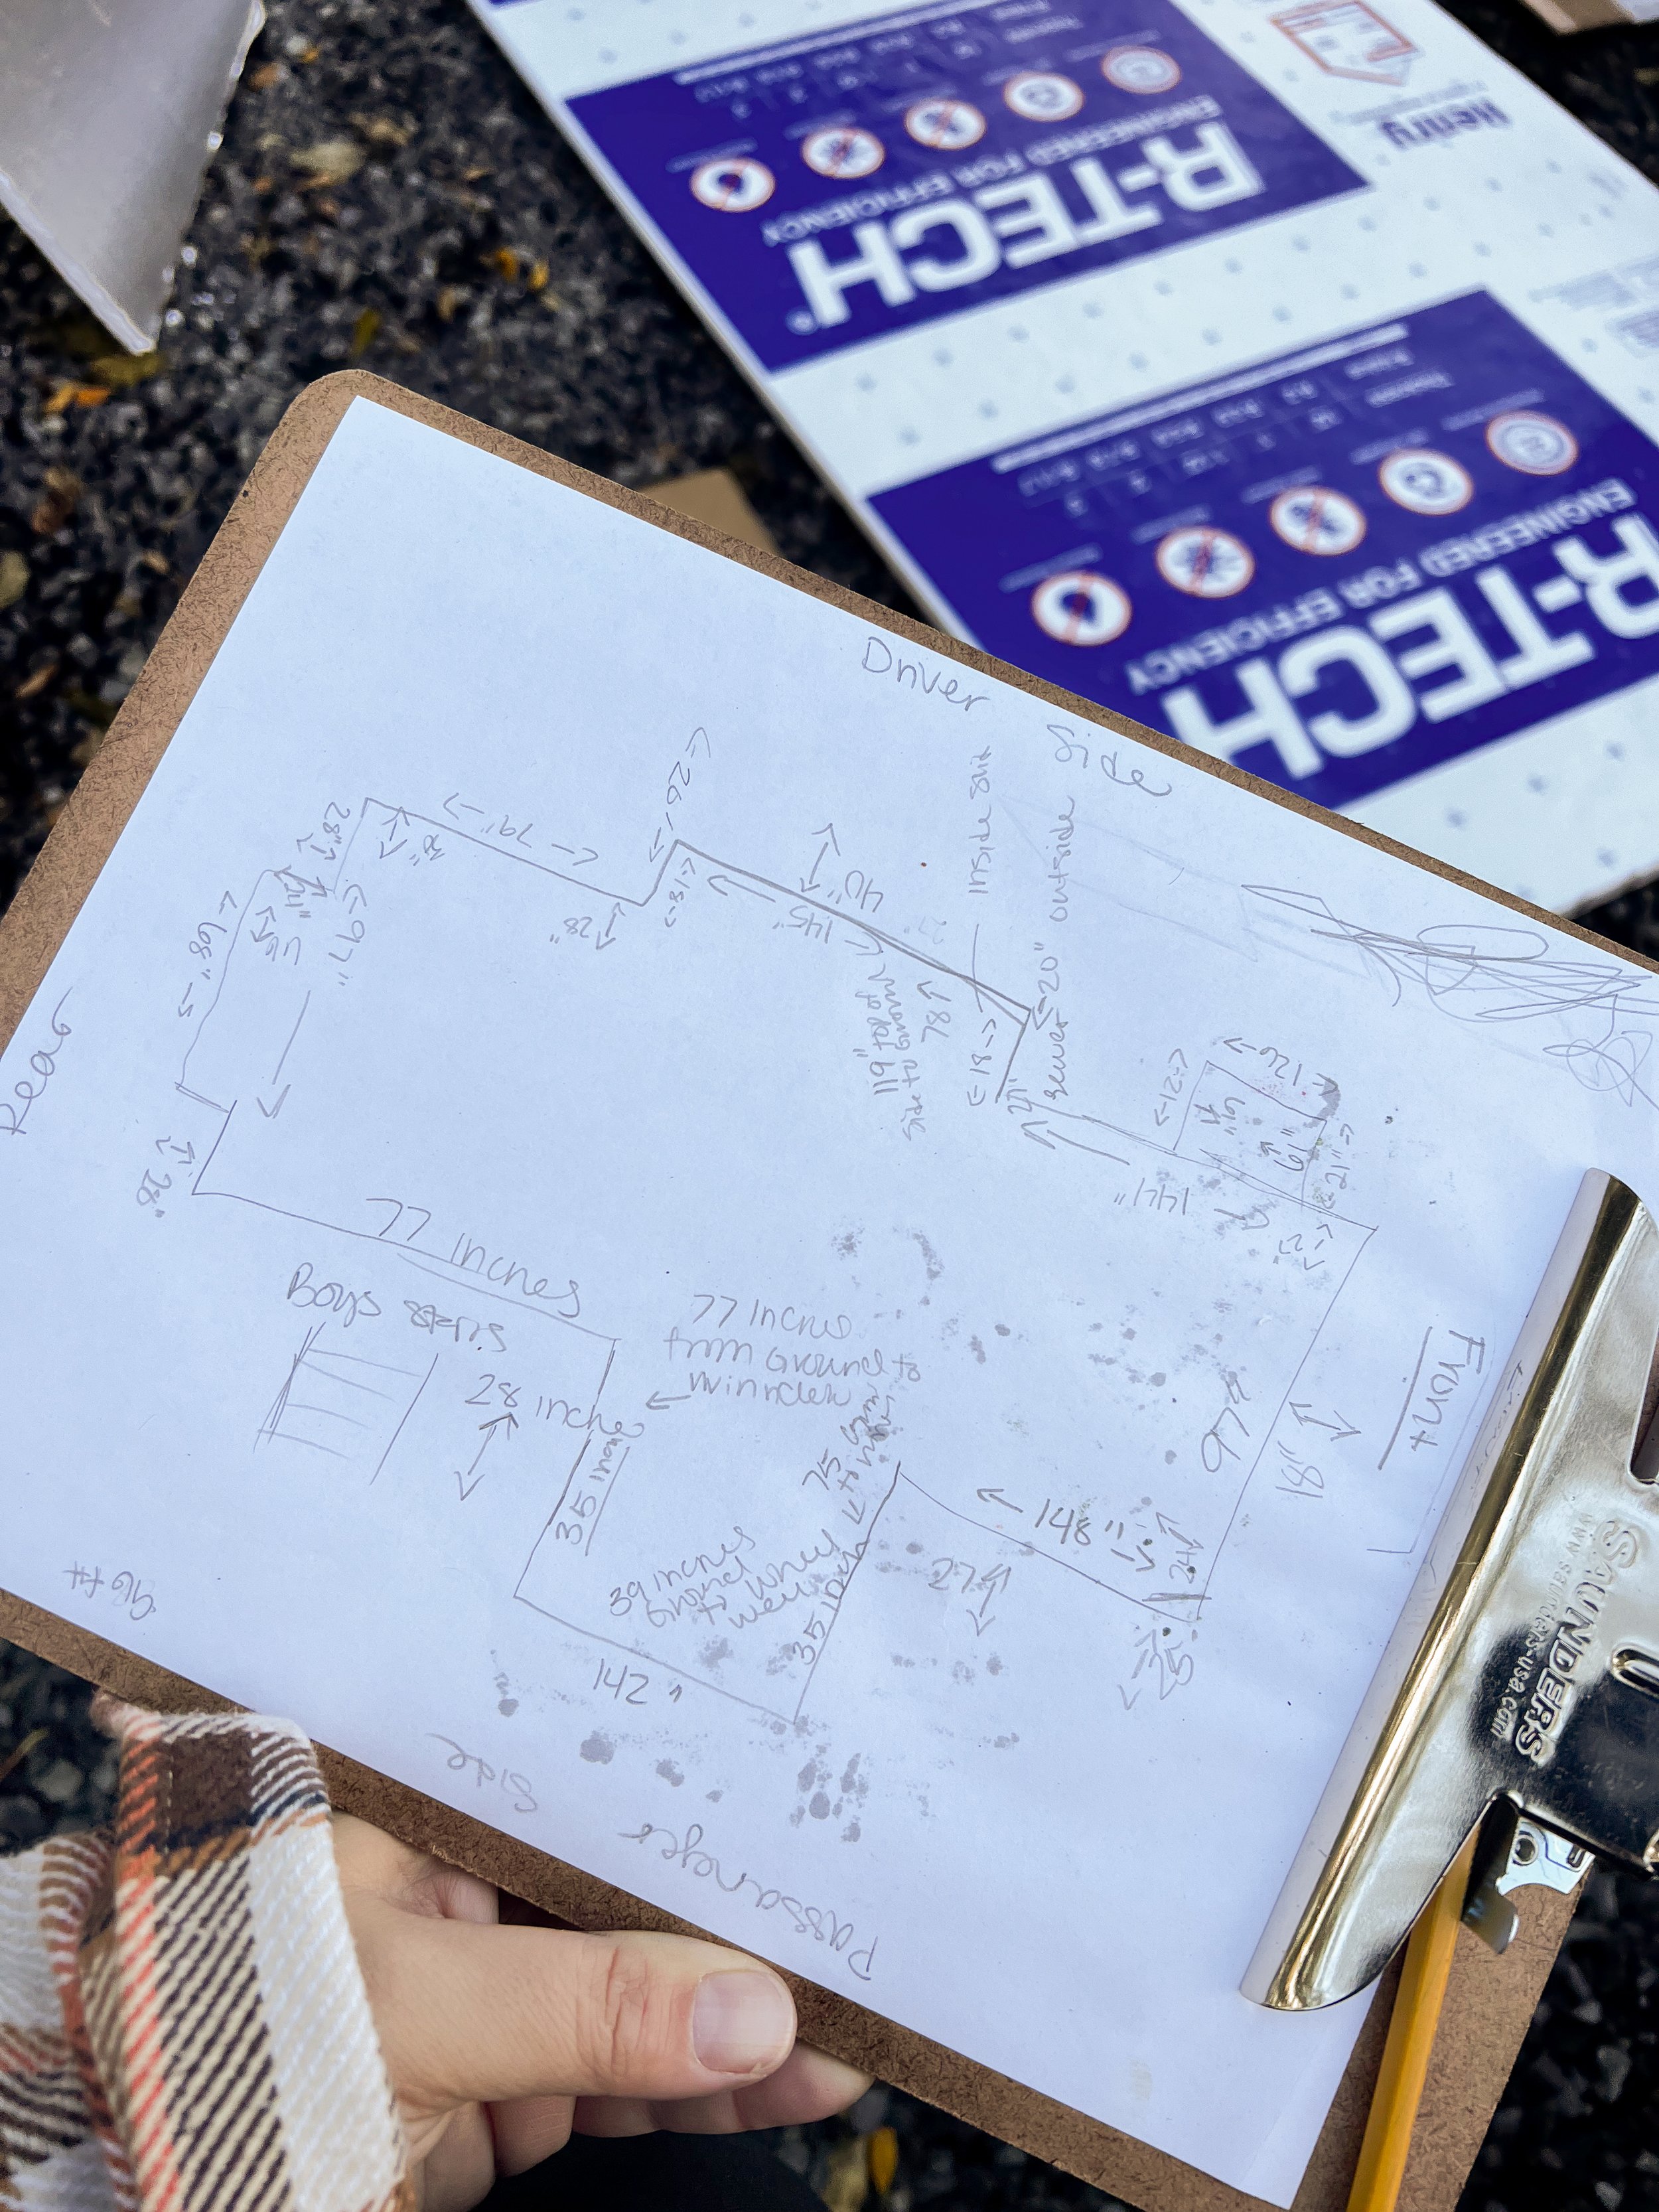
1. Plan Ahead and Take Measurements
Start by sketching your RV’s layout on a sheet of paper. Measure the following areas:
The distance from the ground to the bottom of your RV.
Around the slide-outs.
Use these measurements to calculate how many foam boards you’ll need. We found that 10 boards were perfect for our 5th wheel, but the number will vary depending on your rig’s size.
Pro Tip: If you’re new to this, visit a hardware store beforehand to get a feel for the materials and costs.
2. Purchase Foam Boards and Tape
With your measurements in hand, head to your local hardware store. Look for rigid foam boards that are at least one inch thick for proper insulation. While you’re there, grab two rolls of durable reflective tape.
Budget Tip: Foam boards are an affordable option compared to custom RV skirting or vinyl skirts, making them a popular choice for full-time RVers.

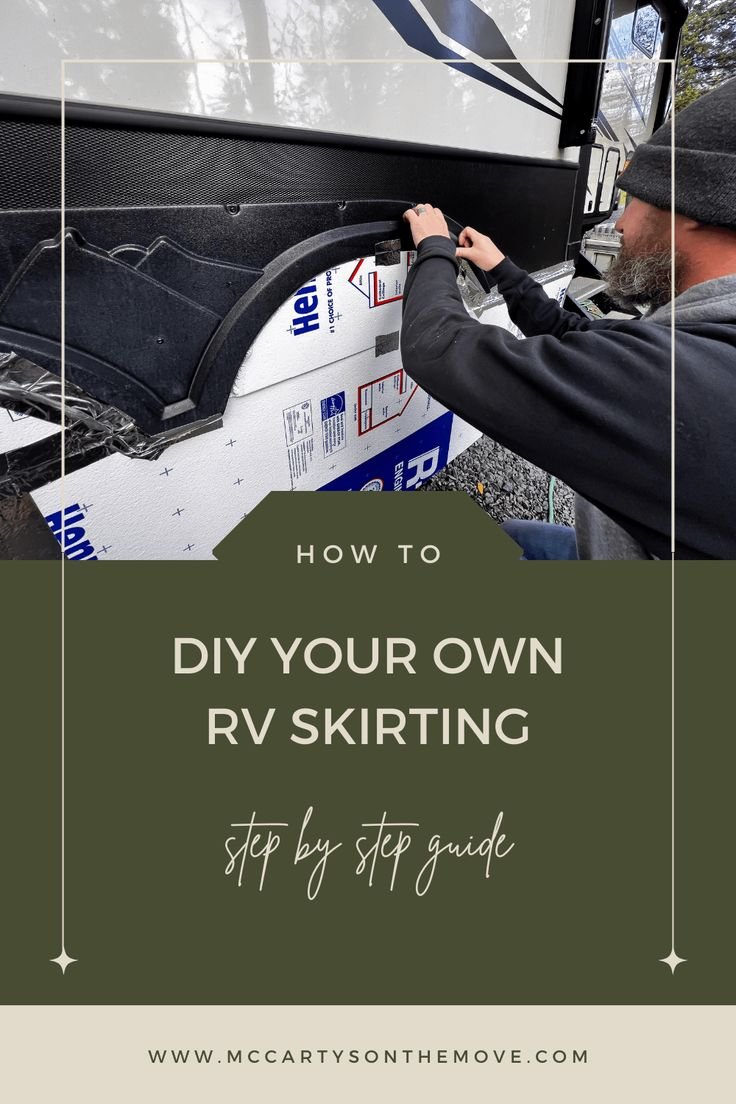
3. Measure and Cut the Foam Boards
Lay your foam boards flat and double-check your measurements before cutting. Use a pocket knife or utility knife for smooth, precise cuts. We found that a foam board makes an excellent straight edge for marking and cutting.
Remember: Measure twice, cut once! This will save you time and materials.

4. Install the Foam Boards
Begin attaching the foam boards to the bottom of your RV. Work section by section:
Cut one board to fit a specific area.
Use reflective tape to secure the board to your RV.
Move to the next section and repeat.
For slide-outs, you can stop the boards just below the windows to allow for natural light while still blocking drafts. Use extra tape on corners and edges to strengthen the bond, especially in high winds.
5. Enjoy the Benefits
Once your skirting is installed, you’ll notice an immediate difference. Your floors will feel warmer, your RV will retain heat more effectively, and your propane usage will decrease. We completed our project in just four hours with minimal tools, spending around $170—money well spent for a warm RV during the winter months.

Common Mistakes to Avoid
DIY projects can have hiccups, but here’s how to avoid common pitfalls:
Using Low-Quality Materials: Invest in durable foam boards and tape to withstand extreme cold.
Skipping Measurements: Precise measurements are crucial for a snug fit.
Ignoring Maintenance: Check your skirting regularly for gaps or wear, especially after storms or heavy wind.
Not Accounting for Access: Leave gaps for essential areas like doors, water hookups, or storage compartments.
Alternatives to DIY Skirting
If foam boards aren’t your style, there are plenty of other RV skirting solutions:
Plywood Panels: A sturdy option for colder climates, though less portable.
Canvas Skirts: Lightweight and easy to install, but not as durable in extreme weather.
AirSkirts: For those who prefer a hassle-free option, AirSkirts offers inflatable RV skirting that’s reusable and simple to set up. Check out AirSkirts here. Use code: mccartysonthemove for $100 off.
Maintenance Tips for Long-Term Use
To ensure your DIY skirting lasts all season:
Check for gaps or damage after storms.
Reinforce corners with extra tape if needed.
Store foam boards flat during the summer months to prevent warping.
Pro Tip: If you’re not moving your RV during the summer. Leave the insulation up as it will help keep the extreme heat out and keep your RV cooler.
Read More: Easy Tips on How to Control Moisture in Your RV
Final Thoughts: Is DIY RV Skirting Worth It?
Absolutely! DIY RV skirting is an effective, affordable way to keep your RV warm during the winter season. Whether you’re parked at an RV park in sub-zero temperatures or enjoying winter camping in a remote area, skirting makes a huge difference in comfort and efficiency.
If DIY isn’t for you, options like AirSkirts provide a professional, ready-made solution. No matter your choice, the key is preparation—because staying warm on the road is priceless.
Ready to Stay Warm This Winter?
We hope this guide inspires you to take the leap into DIY RV skirting. If you try it, we’d love to hear how it went—share your experience in the comments!
For more RVing tips, tricks, and behind-the-scenes looks at our adventures:
Follow us on social media for daily updates.
Sign up for our newsletter for exclusive content delivered to your inbox.
Let’s make this winter your coziest one yet. Happy RVing, friends!